Do you use Blogger a lot? Then you will surely have sometime or the other changed
the template. I did. And it set me thinking, what are these <$Blogger$>
symbols. How are these templates designed?
If you want to read to design a template read on. You will probably need to understand
how HTML works. Some CSS might be useful too. But apart from that nothing else
is needed.
The Blogger templates are based on CSS and HTML. Any valid HTML/CSS construct
can be used. But then Blogger adds some more extensions. These are the Blogger
tags. So any non HTML tags you see in a template, it’s a Blogger tag.
Why do we need Blogger tags? A template is nothing but a, well template. It must
show different data depending upon the blog, author and a million other things.
Say I want to show the name of the blog in the title bar. Now there is obviously
no HTML tag for it. So what should I show. Will “I hate aliens” caption
be ok? But fret not, Blogger tags to rescue. <$BlogTitle$> does it.
Now some of the Blogger tags will have the $ sign in front and at end like <$BlogTitle$>.
These are the variables. They take different values depending upon the blog, post
etc. The tags without the $ sign allow formatting. But more about them later.
Oh one more thing, the Blogger tags case sensitive, unlike the HTML tags.
With all this information behind us let us try to make the simplest template possible.
It just shows the various posts without any formatting and any hyperlink.
<!DOCTYPE html PUBLIC "-//W3C//DTD XHTML 1.0 Transitional//EN"
"http://www.w3.org/TR/xhtml1/DTD/xhtml1-transitional.dtd">
<html xmlns="http://www.w3.org/1999/xhtml">
<head>
<title><$BlogTitle$></title>
</head>
<body>
<Blogger>
<$BlogItemBody$>
</Blogger>
</body>
</html>
When I apply this template, this is what my blog looks like.
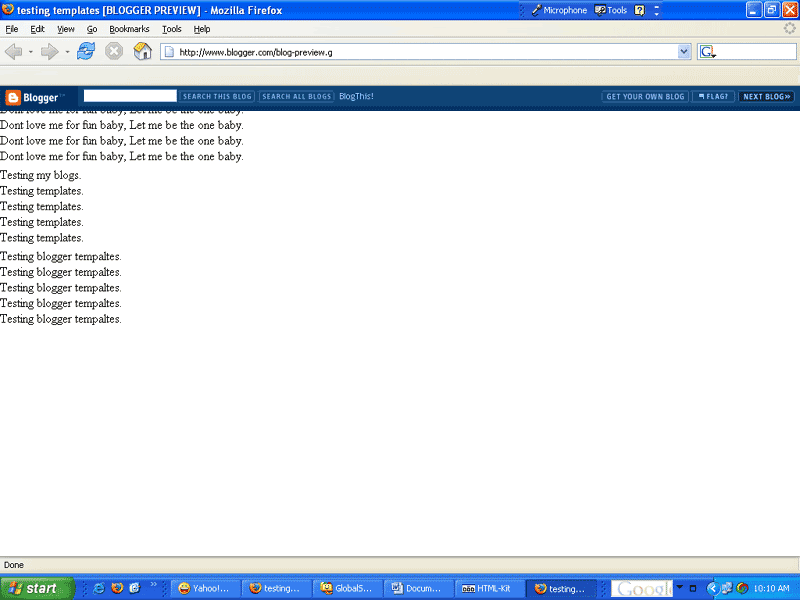
We used three Blogger tags- <$BlogTitle$>, <Blogger>, <$BlogItemBody$>.
The <$BlogTitle$> tag was used to get the name of the Blog in the title
bar. Then we used the <Blogger> tag. Did you notice it had no $ sign.
It is repeating kind tag. Anything between this tag repeats for all entries.
So as we wanted to show all our posts, we included the <$BlogItemBody$>
between Blogger tags. Also as you might have guessed the <$BlogItemBody$>
gives us the posts of the blog. We need to close the opening <Blogger>
tag with a closing </Blogger> tag. Any Blogger tag without the $ sign
must be closed. But the tags with $ sign are not closed.
By the way this template sucks, doesn’t id. Like you wrote the blog, and
it does not even acknowledge the writer. And by the way when did you write it.
An hour ago or a million years ago. So now let’s add the name of the author
and the time to the blog. And while you are at it, make a navigation structure
to move through the blog.
<!DOCTYPE html PUBLIC "-//W3C//DTD XHTML 1.0 Transitional//EN"
"http://www.w3.org/TR/xhtml1/DTD/xhtml1-transitional.dtd">
<html xmlns="http://www.w3.org/1999/xhtml">
<head>
<title><$BlogTitle$></title>
</head>
<body>
<Blogger>
<br>
<br>
<$BlogItemBody$>
Posted by <$BlogItemAuthorNickname$> on <$BlogItemDateTime$>
<a href="<$BlogItemPermalinkURL$>">permanent link</a>
<br>
<ItemPage>
<a href="<$BlogUrl$>">Back to index</a>
</ItemPage>
</Blogger>
</body>
</html>
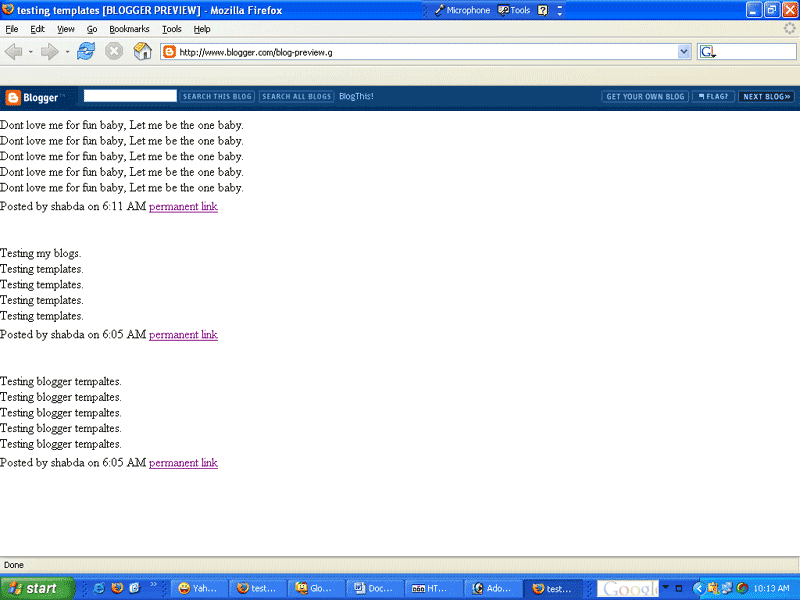
As you can see now the name and time are visible along with a link to the post
pages.
Let’s see the new tags we have used. We want to write the name of the
post author and the time post was created. We can do it using <$BlogItemAuthorNickname$>
<$BlogItemDateTime$> tags. But then we want a link to individual posts.
<$BlogItemPermalinkURL$> provides the address where current blog resides.
But then when the user visits one of the post pages he needs a link to the index
page. But we do not want a link if we are already on the index page. So we put
a link using <a href="<$BlogUrl$>">Back to index</a>,
but enclose it within a <ItemPage> tag. Anything within the <ItemPage>
tag will only print if the current page is a individual post page. So our link
will be visible only on the post pages.
Next we need to allow the people viewing our blog to post comments. And what
is the permanent link doing on a post page. Let’s see our next template.
<!DOCTYPE html PUBLIC "-//W3C//DTD XHTML 1.0 Transitional//EN"
"http://www.w3.org/TR/xhtml1/DTD/xhtml1-transitional.dtd">
<html xmlns="http://www.w3.org/1999/xhtml">
<head>
<title><$BlogTitle$></title>
</head>
<body>>
<Blogger>
<br>
<br>
<$BlogItemBody$>
Posted by <$BlogItemAuthorNickname$> on <$BlogItemDateTime$>
<MainPage>
<a href="<$BlogItemPermalinkURL$>">permanent link</a>
</MainPage>
<BlogItemCommentsEnabled>
<a href="<$BlogItemCommentCreate$>"
<$BlogItemCommentFormOnClick$>>
<$BlogItemCommentCount$> comments</a>
</BlogItemCommentsEnabled>
<br>
<ItemPage>
<BlogItemCommentsEnabled>
<a name="comments"></a>
<h4><$BlogItemCommentCount$> Comments:</h4>
<BlogItemComments>
<a name="<$BlogCommentNumber$>"></a>
<p>
<$BlogCommentBody$>
</p>
<p>
By <$BlogCommentAuthor$>, at
<a href="#<$BlogCommentNumber$>">
<$BlogCommentDateTime$></a>
<$BlogCommentDeleteIcon$>
</p>
</BlogItemComments>
<p><a href="<$BlogItemCommentCreate$>"
<$BlogItemCommentFormOnClick$>>
Post a Comment</a></p>
</BlogItemCommentsEnabled>
<a href="<$BlogUrl$>">Back to index</a>
</ItemPage>
</Blogger>
</body>
</html>
This is what our blog looks now.
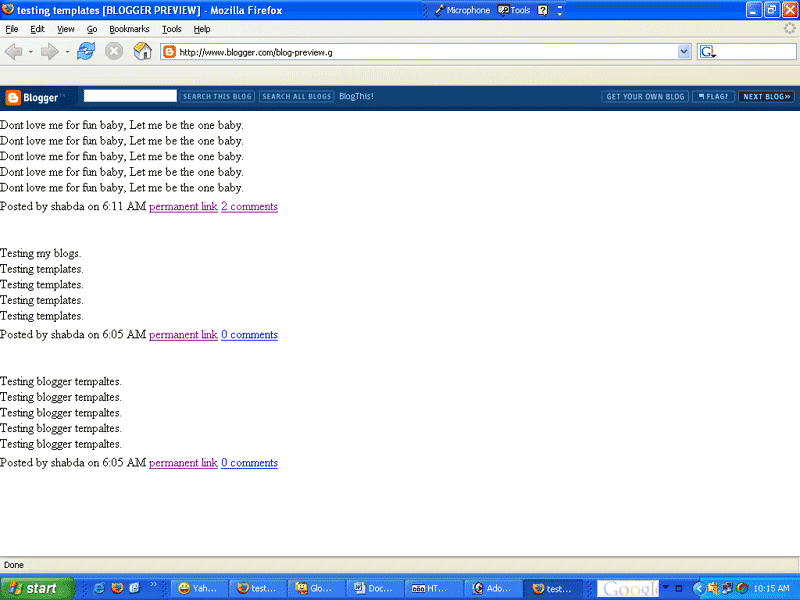
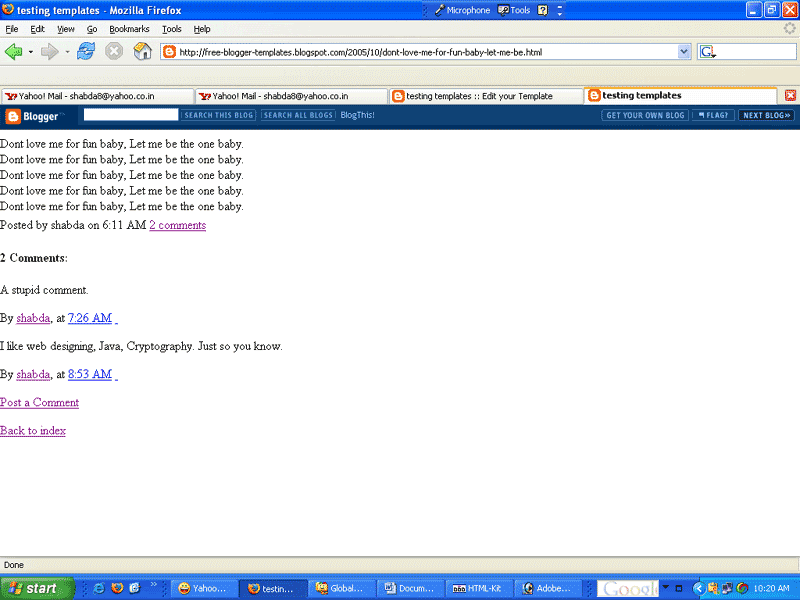
And our post pages will also show the comments.
We have enclosed the <a href="<$BlogItemPermalinkURL$>">permanent
link</a>
tag in a <MainPage> tag so that the permanent link is not visible on post
pages. We need to allow users to make comments only if comments are enabled.
So we use the conditional tag <BlogItemCommentsEnabled>. <BlogItemComments>
is a tag similar to <Blogger> tag in the sense that is will repeat anything
between it for all the comments. All other tags have fairly descriptive names.